Monday, March 26, 2012

...weekend round-up

Remember when I had the list of things to sew this weekend? I totally shocked myself about how much I got done. It went something like this...

Friday night -
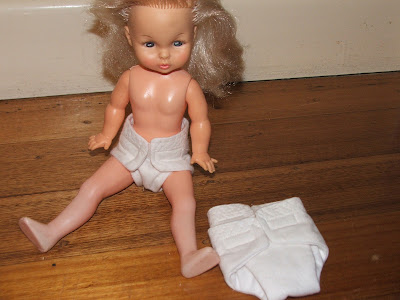
Doll nappies
Not having children of my own I don't have a ready supply of model dolls but I did find a genuine  80's version of mine - Zoe - with the punk rockers hair!
Saturday - 
Finish and stuff the embroidered robot softie,
Make a nappy pouch,
Make a doll swaddle quilt,

Sunday -
Make a bear carrier/baby bjorn
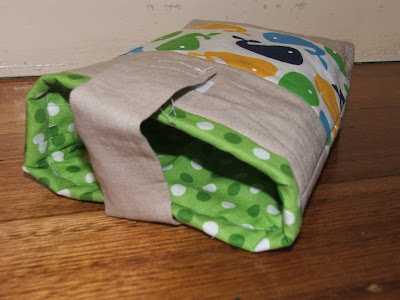
Sew a lunch bag, and get frustrated because you mis read the directions so now it isn't as deep as it should be.


Sew some bee blocks


Somewhere in there I also finished appliquéing the back of my Scrappy Stars backing and finally sewed down the binding on my second Sorbetto after unpicking half the neckline only to realise it actually wasn't on the wrong way.

I've still got some curtains to go on a deadline of next weekend (luckily daylight saving ends so I'll have an extra hour) as well as all the other things I've always got half finished in the wings! 
More on these specific projects over the next few weeks.

Friday, March 23, 2012

...weekend plans

I true 'me' fashion I have a very long list of things I would like to accomplish and with knowledge born from experience I'm sure I won't get around to finishing, or starting, many of them.

Most are in anticipation of the imminent arrival of a new baby for friends - gifts for baby, big sister and some curtains for her new bedroom. Then there is the top I just need to finish - a new lunch bag I have had in the planning for ages and, while not strictly on the list, I'm really excited to get stared in my Trimmings project. Add a couple of sets of bee blocks and I think that rounds out the list!.

Monday, March 19, 2012

...a finished top - entierly by hand!

I almost can't believe that I had the patience and persistance to finish this quilt top - and that I still am enjoying it so much that I am already planning the quilting to be done soon - and by hand as well.

There are 32 'star' units in the quilt as well as 6 half 'stars' at the edges, 62 hexagons, 16 half hexagons and 10 half diamonds to form the edges. Each one was basted by hand and hand sewn into the top and then all 304 paper shapes removed. Well almost all, I have left the edge ones in for now and remove them at basting time.

All that adds up to 1592.5" of whip stitched seam. I was glad of a thimble.


The top measures 45" x 56" so it it pretty firmly a baby-lap sized quilt - and leaves me with nothing but admiration for people that can made a full sized quilt in this way - and using much smaller shapes!

I've started on the backing - ready for basting soon. There are 'spare' hexies (basted when I was going to make a multicoloured bacground) joined and then hand appliqued to the backing to hide the seam joining the two backing pieces together. There is a random spare star to be appliqued on the back as well - but I need to wait for after basting for placement. Confused - I'll explain in pictures later!


The next job will be to prepare the batting - as this quilt is part of the Scrap Attack Quilt Along I thought I would continue with the scrap theme. I have an (overflowing) box of reasonably decent sized batting scraps and will piece two of these together to get the batting for this quilt!

Friday, March 16, 2012

...stitching by hand and machine

My Scrappy Stares quilt as part of the Scrap Attack Quilt Along is progressing - I am really hoping I can get this top finished in the next week to be able to enter it into the Festival of Scrappiness.

There was a small setback on this yesterday when I dropped four of the basted hexagons on the way to the car in the morning and they were found later in the morning by N - quite possibly having been run over by me but most definitely having been rained on and left to languish in a puddle. I'll need to redo these ones!

I've also been sewing madly for a new arrival due in about a month but likely to arrive a few weeks early. The order of the day this week - a Sleepy Sack from Anna Maria Horner's Handmade Beginnings.
Mine looks a little different from the picture as I placed the pattern pieces on the wrong way so the opening is to the right rather than the left!
Overall I'm pretty happy with it but there are some finishing issues I would like to improve in later versions - entirely due to my errors or laziness in constructions.

The outer fabric is a Moda Flannel and the lining a Free Spirit Solid Voile. So soft!

Wednesday, March 14, 2012

...tips and tricks #1

Occasionally I stumble across a tip or trick that makes this quicker or better or neater for me. I can't say they are ground breaking or new - except to me when they pop into my brain. If I remember to snap a picture I'll share them with you on a sporadic basis. 

I find that sometimes, especially when I am trimming a little bit off a lot of units or I am cutting pre-cuts with the pinked edges I get a lot of fabric dust on my cutting mat. And it sticks in the tiny marks left by the rotary cutter and doesn't really come way with the swipe of my hand directing it into the bin.

My secret weapon? A small handheld vacuum cleaner, or dust buster. I'm sure a small head on a regular vacuum would be just as good if not a little more cumbersome. I swipes it all up super quick!

Monday, March 12, 2012

...finally finished... something

This is not my longest standing work in project - I haven't even really been working on it officially of much more than a week but I have been planning it for almost exactly a year. And it feels like absolutely ages since I have actually finished anything so this is incredibly satisfying.
That isn't even all of them!
This cushion cover is made from 14x14 1.5" finished half square triangles that were the trimmings from the star corners that I had made saved from when I made this quilt over the same long weekend last year. That is 196 HST units and 392 tiny squares of fabric. Why did I think that this would be a quick project when that is more seams than some bed sized quilts have?!?


I trimmed them all to 2" - which in most cases was very little fabric indeed but I ended with with quite a pile of sneeze inducing scraps!


I quilted some zig zags into the white areas - the cushion front is simply the panel on a batting scrap - there is no backing.


I made the cushion back using about 1/2 yard of the central park trees I had and  used this tutorial for a concealed zip back - a slight error means the zipper flap faces the right way or the trees do. I chose the trees.


I love the look of cushions with a piped edge but don't think I do it well enough so this time I tried binding the pillow as I would a quilt and I quite like how it has turned out - with the frame. I might be a convert to this method.


The binding is the leftover quilt binding, the backing some fabric bought for the quilt and never used and the story of the blocks is already told! So in the end I have a 21" square cushion completely from scraps!

Thursday, March 8, 2012

...help! Crochet competent people.

I love this crochet throw. I don't crochet. I can patchwork and quilt so my plan is to recreate a version of this in fabric (and invite you all to quilt along with me).

But this is where I have come up against a stumbling block since July last year when I first saw the design. Last night while I was washing my hair I stumbled what I hope might be a solution -

are there any people that can crochet  that could make one square of one of the three (or all three) units I can't make out well enough from the photos. They are only small (the fabric ones will be bigger) and I imagine could be worked from yarn scraps. It would greatly appreciated!

Please comment or email me (details in my profile) if you are happy to help out and I'll send you the direction for the unit!

Note: This design was published in the August 2011 edition of Australian Better Homes and Gardens Magazine

Sunday, March 4, 2012

...notes and pictures from the weekend

A busy weekend full of baking, sewing, cooking and all the normal weekend chores. 
After my post on Friday looking for some new bread recipes I got one from Becky. I tried it out and the finished texture is great. The quantities didn't quite yield the dough weight I need for it to prove to the lid in the pan but I think a 1.5 mix might work. For now I took the lid off and made a domed loaf that we are already a lot of the way though. 
I also started a scrap project that I kept the bit for for the last 51 weeks - these are the off cuts from the star points from this quilt. I had already sewn them into half square triangle units, the job now is just to trim them all to 2" and sew them together. 
It will end up 14x14 units - 1.5" finished units for a 21" cushion. 
'
I also finally got pictures of my finished Giant 'Valentines' Swoon. The top is 80" square, I'm just considering quilting now. 
An afternoon movie yielded the latest Dessert of the Month stitchery. 
My tip for keeping track of where you are up to - use a highlighter to mark the stitches executed
A few more seams on the scrappy stars too - I hope to have this one finished by the end of the month.

Friday, March 2, 2012

...baking bread

Earlier this year I decided that I wanted to bake our bread. And I have been but I have come up with a couple of problems.

One of the things that I did when I made this decision was to buy a pullman pan locally from No Knead Bread to make the square shaped loaves similar to those from the shop. They fit in the toaster and the sandwich keepers better that way and I figured that this was the shape of loaf we are used to and more likely to continue to use.

The instructions for the pan is quite specific that the weight of dough that needs to be placed in the pan is 900gm in two 450gm balls in order for the volume of the dough to rise to the top of the pan at the proofing stage and fill out the square shape.

So the past month or so I have been on a mission to find a dough recipe that we like, has few if any 'extra' ingredients (other than flour, water and yeast) and yet has a nice crumb and crust.

So far I have tried a few recipes from the Artisan Bread in Five Minutes a Day books, a loaf from a Soups and Breads and some left over pre-mix I found in the cupboard from awhile ago.

I've also had a look at the recipes in the Bourke Street Bakery book and various other recipes from a lot of the other books on my recipe book shelf.

I like the recipes from Artisan Bread but I think that they work better as free form loaves - it might be me or it might be something about the technique that these books use but I find is really difficult to get them to rise to the top of the tin before baking. I found the recipe I used from the Soup book was quite dry but I think that was a lot to do with my altering the amount to try to get only 900g of dough for my two 450g balls.

I really like the idea of the Bourke Street recipes and I have made a number of things from this book successfully and have been able to enjoy the wares fresh from the shop when we lived in Sydney but as I won't need to bake everyday growing a sourdough starter seems to be an exercise in waste.

All this is a rather long winded way of asking - do you have any go to bread recipes or reference recipe books you could share?