Monday, April 30, 2012

...planning stitching and crackers (do. Good Stitches March Cherish Quilt)

This post is about the quilt I have designed for the next month of the Cherish Circle in do. Good Stitches {a Charity Bee}


I make no claims the that following block design or colour choices are my own. I have taken ideas and inspiration from this design on the Moda Bakeshop by Mary from the Tulip Patch and this block by Angela from Cut to Pieces. A colour plan came from the Warm and Cool quilt along hosed by Jeni from In Color Order. I have chosen to revise the block tutorials highlighting the measurement of block components and colour placements for clarity and the ease of use by my bee mates. So here goes!


This month we will each be making one larger than average block that is constructed in four quarters (two warm and two cool in this design). 


To construct the whole block you will need


(4) 6" square of white (any will do but please avoid creams, light greys and beige
(2) 6" warm colour squares (or 4 triangles cut from 2 6" squares) 
Cross cut all of the squares into triangles

(2) 6" cool colour squares  (or 4 triangles cut from 6" squares)  
(4) 2 3/4" x 7 1/4" cool colour rectangles

(4) 2 3/4" x 7 1/4" warm colour rectangles 
(4) 2 3/4" x 7 1/4" rectangles of white (
any will do but please avoid creams, light greys and beige )
Note: As part of the Quilt Along Jeni had a great primer on Warm and Cool colours, worth a read here. Like her, I am looking for colours that are medium value but on the warm or cool spectrum. Sticking to the medium value should help the blocks to fit cohesively together. 

This would be the time to raid your scrap box to get a huge variety of fabric colours and prints. The hardest to include variety in will be the squares (to become the corner triangles) because of the way they are cut but if you have some off cuts from large HST this would be a great use for them. 


Constructions
1. Make the centre units 
Sew a warm (cool) strip to each side of the white strips. You will end up with four units, two warm and two cool. Press seams towards the coloured strips. 


2. Sew on the coloured triangles
- Find the centre of the centre white rectangle and the centre of the long side of the triangle. To do this fold the units in half and finger press the centre, be extra careful when doing the triangle so as not to warp the bias edge.

 - Match the crease marks and sew triangle to the centre square. Press the seams towards the coloured triangle on the warm blocks and the centre unit on the cool blocks. 
- You will end up with something that looks like this. 
- Repeat with the other three units. 

3. Sew on the white triangles
- Using the same method find the centres again. 
- Match the crease marks and sew on the white triangles. Press seams towards the triangle on the cool blocks and the centre unit on the warm blocks. 
- You will have one quarter unit completed!
- Repeat with the other three units. 

4. Trim your units
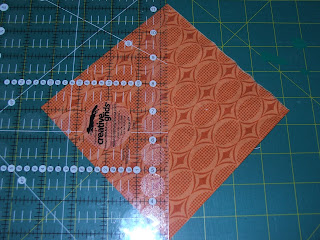
- The units have been deliberately oversized. They will be trimmed to 10" square. I find having a square ruler really helps me do this and this is how I have done it in the pictures but there is not reason is can't be done with a straight ruler. 
 - Place the ruler over the completed block, matching the mark 1/4" from the edge of the ruler with the spot where your centre unit and triangles meet. This will ensure you are left with a seam allowance that will not cut off your points when you join the units!

5. Sew your units together to make a block!
 - Lay your units our with the coloured triangles meeting in the middle and the units forming an 'X' of sorts. 
You will want the warm units on the top left and bottom right. 
 - Pin the units that form the top row together matching the points and sew. Press towards the 'Warm' block. 
 - Repeat with the bottom row, again pressing towards the warm block. 
 - Sew the two halves together nesting the centre seam and matching the triangle points. 

Your block will be about 19.5" square and finish in the quilt at 19"


Success! Thanks so much 'Cherish' Bees!

Monday, April 23, 2012

... on the weekend

I feel a little bit like I haven't been blogging much lately but I think that is OK. I've been sewing and living life instead. Having said that I have some post written that I just need some daylight and fine weather to get picture of. While I wait for that some random pics
A win for the Dockers on Friday Night. Yay!

Some cute knitting needles at the Finders Keepers Market

Working on my Trimmings project

Wednesday, April 18, 2012

...stacked

In case of a freak Melbourne snow storm and an complete failure of the heating system!


Thursday, April 12, 2012

...knitting

As the season is changing my thoughts have turned a few times to knitting. Over the last little while I have been trying to remember if I learnt to knit or sew first. I can't. I remember learing to cross stitch when I was about 8 or 9 and I am sure I knew how to machine sew and knit before that but try as I might I can't put the arrival of these implemements in a better time context than that.

I am almost 100% sure these were given to me by my Grandma, as opposed to my Nan, which is a little strange because Nan is the 'knitter' and Grandma is the weaver, spinner, gardener and general tryer of many things (must be where my craft and home skills ADD comes from). I'm also almost certain that it was actually Mum that taught me the basics and I know it was her that had to fix all the mistakes cause I'm still not confident with the unpicking side of things when it comes to yarn stitches. I do know this was my first 'kit' of yarn tools.

Over the years I've chosen sewing more often than knitting and I have not developed any skills at all in crochet. I don't really have the patience to hand knit a garment - takes too long and I too easily loose my place. With some thought I could probably list everything I've ever finished knitting, a few scarves, some baby socks that I had to start again from scratch everytime I made a mistake (see unpicking issues) and one jumper, sweater for all the Americans with very fat wool and needles. I did this one in four days/sittings (front, back, sleeves - see losing my place issues). There was also that sock effort that was abandoned last year and the yarn sent of to Mum for completion.

None of this has put me off completely and I'm planning the Honey Cowl and a pair of Pom Pom Peds this winter. Never mind that this is the umpteenth cast on of the Honey Cowl and I am trying to convince myself I don't actually need to pull it off the needles and start yet again to fix the pattern repeat issues. The bit that really cuts me about this is I acutally finished it earlier this year and something went wrong with the casting off and it all fell apart.

I've tucked this aside for the peds - along with the hope the bamboo needles are a little more friendly and this lot does not have to be sent on to Mum as well.

Tuesday, April 10, 2012

...of pictures, cameras and frustrations

I've though long and hard about writing this post  - if it is the tone or content I want on my blog but as this is still frustrating me weeks later I think it is the word of mouth information should be shared in a community that uses cameras a lot.

If you are particularly likely to attend to detail you might have noticed that I have been taking a lot more photos with my phone lately and some with an older camera I have. This has all come about because my 14 month old Olympus point and shoot is unuseable - because a tiny plactic clip that holds the battery in place inside the camera has broken. This has happened without it being dropped, heavily used or otherwise maltreated. In all other respects the camera works fine - and is as new. I mean it is only 14 months old. I think a $150 camera should last longer than 14 months. I think most people would consider that reasonable. Do you? If you follow the link you can let me know in a one word survey. Am I being unreasonable? Keep in mind that I make handmade goods - so quality rather than disposability is important to me and I'm happy to pay a little extra at the time of purchase to ensure something lasts. I mean until last week we had a dishwasher made in West Germany.


As it was a little over 12 months old - the standard manufaturer warrenty period - although this was not indicated anywhere on the packaging or documentation I got with the camera I assumed the manufacturer warrenty had expired. Happily in Australia there are also additional statutory comsumer rights that can extened warrenties under certain conditions - generally related to reasonable expectations for the life cycle of a product. More information about these rights can be found here and here.
I understand that with these rights some responsibilites. I kept the camera in a sturdy case. I didn't throw it around or drop it. Basically I treated it with respect. I understand that I had to provide the manufaturer a chance to review the camera and acertain that it was broken and not due to misuse on my part. I incurred a cost to get it to Sydney (the only Olympus repair centre in Australia and an address sourced on my own - also not in the packaging). Working on the premise that I am being resonable I sought to enact my rights having acted on my resonsibilities.

I got back an email (later followed by a letter) resquesting co-payment in the amount of $60 to fix the clip. I was told I had no rights as described above (which I later confirmed to be incorrect) but that the amount was less than the actual cost of the repair (parts + labour) which was actually about $165, more than the RRP of the camera when new!

What followed was a exchange of emails where I continually pointed out my rights, explained why their response was wrong, with references - in turn I was offered a number of different reasons that I had to pay this amount to have the clip repaired. In the end I informed Olympus I would be referring the matter to Consumer Affairs for mediation as I did not believe they were acting within the Consumer Law and I was asked to send extra money to have the camera returned to me (this expecation was not communicated until after I had sent the camera there). I asked them to hold the camera until a resolution was reached. Next thing I knew the camera had been sent back to me - unrepaired.

At this point I was extremely frutstrated and in addition to the report to Consumer Affairs I sent a letter detaling my frustrations to the Cusmer Service section of Olympus (you can read it here)- who forwarded my letter to the Service area I had been dealing with as they said it was not their issue. How could customer service not be their issue? The response I recieved from the Service Department - we'll wait to hear from Consumer Affairs and won't discuss the matter with you further.

I've now been informed that Olympus is refusing to budge from their position, with the exception of sending me a packet to return the camera to them - and because Consumer Affairs is not able to force an action - they can do this, unless I take them to court. Over a point and shoot and $60. In effect they are willing to absorb a cost greater than the wholesale cost of a new unit but still charge me.

I don't get it, can't see I ever will.

Monday, April 9, 2012

...quilts in use

I was visiting friends last week to welcome a new arrival and got a chance to see some earlier made quilts in action in Big Sister's bedroom.


One was made last week and one was the first I finished and gifted to Big Sister at her birth.

Thursday, April 5, 2012

...an inspiration


Is it just me that finds it unusual to have most of the floor covered in carpet in a shopping centre/mall. It us certainly not something I've seen before in Australia to thee best of my memory.
This one is full of inspiration though.

...gifts for big sisters

Being a big sister to not one, but two I can say that it is no walk in the park.

So for a.new big sister, some gifts. The kid in me thinks these will be fun to play with, the adult, that they'll keep the new big sister busy while Mum attends to the new little one.

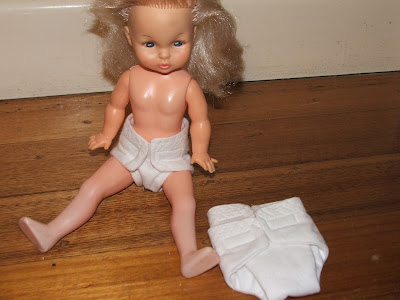
For happy changing time, some dolly nappies. These ones are inspired by those from the swaddled baby love pattern in Anna Maria Horner's Handmade Beginnings. I added a 1/2" seam allowance to these using this method cut two from the fleece and one from quilt batting from the unaltered pattern piece. Sewn and turned they have some real bulk like a real happy. A fancy stitch along the top of the back to simulate elastic, some velcro tabs and done!

And what dolly baby could do without a swaddle blanket? This one from the same pattern, including the swaddle pocket to help little hands swaddlr dolly. You ask me though a doll is a lot easier to swaddle than a real live squirmy baby.

And for trips out, a dolly bjorn from Little Things to Sew from Oliver + S. I used some navy cotton duck for durability and do as to huge some dirt but made a feature of the edge stitching and buttons. And I just love the little pocket on the front. I changed around the cutting placement a little to get the little colour strip at the top.

And finally, for a big sister bedroom, some new curtains.

Tuesday, April 3, 2012

...hot apple buns

I love hot cross buns - without the cross part and the dried fruit. And as we come up towards Easter I have wondered what it is about them that I like. I am sure it is the spices in the bread and the sticky glaze on the top.

So this last weekend I make a version of the buns with fruit that I like, fresh rather than dried apple. I made my dough in the bread maker and then shaped the buns, let them rise again and baked them in the oven. They were great - and disappeared very quickly!

Hot Apple Buns
6g dry yeast
475g bread flour (plain flour is OK too)
25g gluten flour
24g powdered milk
34g sugar
8g salt
2tsp cinnamon
2tsp mixed spice
1-2 cups apple* peeled, cored and chopped into small chunks (you'll need 1-2 apples)
45g butter
350ml water
1 cup flour extra, for kneading
* Granny Smith or other green baking apples are best
Glaze
1 tsp gelatine
2 tbs Water
1 tbs sugar

Method
1. Make the dough with all ingredients according to the instructions of your breadmaker - my dough function allows me to add the fruit mid-cycle to stop the fruit becoming crushed. If you aren't using a machine make the dough by hand and then allow to rise for 1-2 hours and doubled in size.
2. Knead dough on a floured surfacer until the dough is elastic and springs back.
3. Divide the dough into 15 equal portions. Roll each portion into a ball/bun and place on baking tray a little way apart to allow room for rising and spreading.
4. Cover tray with plastic wrap and allow dough to rise for a further 30 minutes.
5. Bake in an over preheated to 200 degrees C for 20-25 minutes.
6. Make the glaze during the last 5 minutes of the baking time by mixing all ingredients in a jug in the microwave or standing in a pot of warm water until the ingredients are melted together.
7. Brush the buns as they come out the the oven when hot.
8. Allow to cool a little then eat spread with butter.


Delicious - I wish the pictures could convey smell - a cross between warm bread and apple pie!

Sunday, April 1, 2012

...tips and tricks #2


When making a pattern for the first time I sometimes find little errors or things that I would do differently in subsequent renditions.

If I don't write these down I have learnt through experience that I will not remember when it comes time to make up the pattern again - so my tip - write it on the front of the pattern!

The featured pattern is a newborn sized snuggler from Lotta Jansdotter from here