Thursday, July 28, 2011

...solids at Spotlight

Have you seen the Homespun solids at Spotlight lately?

I ducked in during my lunchbreak at work yesterday to make use of a 10% off voucher and didn't find what I was looking for but did come across some solids that I picked up to complete a quick project.

And I was really pleasently surprised by the quality and what seems to be a new range of colours. And all for only $6:95 per metre locally.
The feel of them is so much better than they used to be and when I prewashed, as I do all fabric they didn't really run - even the red only gave the hot water a very pinkish tinge.

I still can't quite believe it!

Note: Colours featured Prima Homespun Crimson, Brima Homespun Bonnie Blue, Prima Homespun Apple, Prima Homespun Slate

Tuesday, July 26, 2011

....Martha craft

The friends I see in the flesh are not crafty. In fact they, in affection, often refer to me as Nanna or Martha when dicussing my craft exploits.

But I had not, to date, crafted anything Martha Stewart designed or branded.

I got an idea from this book. The Bell Mason canning, or preserving as we call it in Australia, jars have a two part lid and allowed a pincusion to be added to the lid. I was inspired by yet another staorage option.

As the design depended on a two part lid and this American brand is the only one I know of that has it I didn't think I would be able to find any. As luck would have it, and with a little help from Google, I was able to find the jars in Australia. They are imported by The Redback Trading Company in Melbourne and I bought a few single jars from the Ruckers Hill Food Store in High Street, Northcote.

And in one evening with a few scraps and a hot glue gun I have three new storage jars.

Note: I used the 1L wide mouth, 1L regular mouth and the 500ml regular mouth bottle. The wide mouth I have found to be better for the storage of bulkier items. Small scissors don't fit in the regular bottle neck. The 500ml is great for basting pins and I am going to make another for binding clips.  

Saturday, July 23, 2011

...Doll Quilt Swap II - the beginning

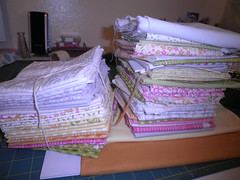
About two months ago I looked around my sewing room and notice how many quilt I had almost done, just started or stacks of fabric waiting with a specific quilt in mind and decided that I needed to concentrate on these things before joining any more swaps. They are heaps and heaps of fun but I have limited sewing time and I need to remember things always take longer than I think it will. 


But then I saw a post on the Doll Quilt Swap Flickr group discussion page about the theme for this round - miniatures - and I couldn't resist. 


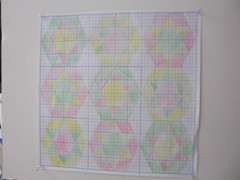
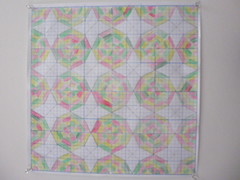
So I have spent some time working out the maths to sew some smaller blocks. Based on my secret partners preferences I came up with two options.
DQS 11 - Option One
DQS 11 - Option Two

I have decided to go with the second option. I do like the stars in the hexagon but someone else is also doing one very similar and I would like to be a little individual!

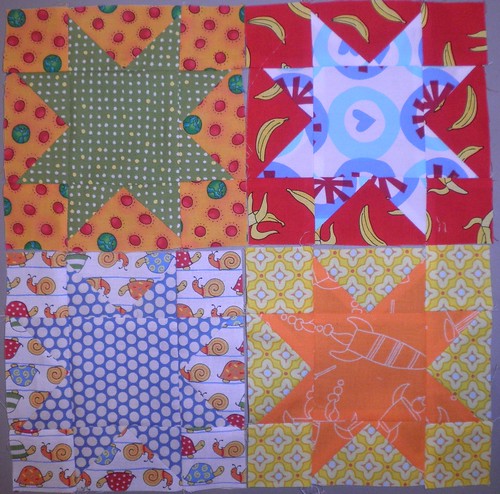
I have started cutting and piecing this afternoon, almost all from my scrap containers. Only the star centres is cut from a 'new' half yard from the fabric cupboard.  

Each of the blocks will finish at 3" and there will be 16 blocks making a quilt of just over 12" square. For such a small quilt there are a lot of seam to sew, and still to go, but I'm pleased with how it is turning out so far. 

Monday, July 18, 2011

...Farmer's Wife Sampler - A start

What seems like ages ago the book arrived to participate in the QAL and then I cut my finger and everything slowed down. But Saturday night I finished tracing and cutting out all the templates and have made a few blocks this afternoon. 


Because this is such a lengthy QAL and the quilt will be quite a special one at the the end of that because of it I have decided to piece it all in Liberty prints. I am going to have to be careful with the values of the prints I think to ensure the design of the blocks show up because very few of these 'read' as a solid. 


I am finding the templates easy to use (my tip to help them stay in place while cutting is a little doubles sided tape) and so far the blocks have turned out to be the correct size - A relief as to re-do the templates may have done my head in!


I'm hoping to make a few more a day over the next week or so and catch up to the group soon. 
'

Saturday, July 16, 2011

Bee Seam Piecing Downunder - Quilt Top Mark II

A while ago I sewed this top together but I stalled at the basting stage - I have come to realise that I didn't like it and I think it was the sashing. 


So I have changed it. 


I used the squares for the outer borders and sashed each of the blocks in come Kona Coal. 


I like it much better now.


Next step, choosing a backing and basting.  

Thursday, July 14, 2011

...Bee a (little bit) Japanese quilt top

...and back.

For my month in this bee I sent a range of cotton/linen blend fairytale themed fabric and some chocolate quilters linen.

I asked my bee mates to make mod mosaic blocks with this tutorial from Oh Fransson.

I have sewed them into a quilt top, and back alternating the blocks with solid chocolate quilters linen blocks.

Now my finger is almost mended I can get to basting and quilting.  

Sunday, July 10, 2011

... secret Sawtooth Stars

6" Sawtooth Stars by HandmadeRetro

6" Sawtooth Stars, a photo by HandmadeRetro on Flickr.


I have two completed bee quilt tops to photograph and show but the wind and rain is still hanging around making good pictures impossible.


It did leave me with the perfect afternoon to cut these out (with a little extra care) and sew them together tonight. They will be on their way to join others for a secret projects. 

Wednesday, July 6, 2011

...Quilt Along Finished - Quilt Bloggers-Block-Palooza

Back in December this Quilt Along was announced and it kicked off in late January/early February. If you somehow missed it (for a while there it seemed the thing that everyone was talking about) the flickr group and 'host' Quilt Dad would be the place to start. 


At the time a group of bloggers were asked to each design a block with a 9-patch or flying geese theme and two were posted each week for 8 weeks. The layout was to be a surprise, although this wasn't clearly spelt out until the second week. I finished all my blocks on schedule but it has taken me a while to get around to sewing the top together and quilting it because I have had some very negative feelings about the quilt along and, consequently, the quilt itself. A real shame because I am really growing to like the quilt I have ended up with. 
This was the first quilt along I joined so I had the idea that the host or hosts would be spelling things out in much the same way as a pattern and give the specific focus fabric to be used I assumed amounts would have been checked . With that in mind, and a week before the first block was to be posted I ordered the fabric recommended, a fat eighth bundle and a few yards of co-ordinating solids and prints.  At this point we were all assured that the fat eighth bundle would be plenty and there would be leftovers. There was, and there wasn't. A few days before the first block was posted a new list of requirements was posted that included a fat quarter of several of the prints in the bundle and a change in the requirements for some of the solids. It resulted in needing to purchase quite a few half yards and a petite fat quarter bundle if I wanted to be able to put to use the considerable amount of fabric I had already purchased and follow the mystery and have a quilt that looked cohesive at the end. After all of that at the end of the quilt along this is just some of the fabric I have left, quite a few fat eighths I never touched and lots of leftover from the petite pack and the half yards. 
Any one else have HEAPS of fabric left over?

The kit we were all told was in the pipeline has never materialised - this quite clearly would have been the most efficient way to purchase the fabric but has not been made available. It seemed a little careless with so much lead time that exact fabric requirements could not be identified before the QA started, or that requirements were given that then changed so dramatically.   


All which made me, and others, a little frustrated before the first block was posted. 


One thing that has really struck me was the commericialisation of the whole thing, Sunkissed by Sweetwater was the line chosen by the hosts as the focus and the one I used to give me confidence I would end up with a cohesive quilt, and also because I liked it. Other, braver souls than me chose to use scraps or different lines. For them fabric choices must have been difficult without a finished reference or very little information about value placement or colourway spread because no information was given beyond how to use the focus line.


Fast forward 8 weeks and I have 16 blocks and the final design is posted. And I don't like it, at all. And it isn't quilted or bound. The 16 blocks just made formed the border of the quilt and I couldn't have thought of a worse way to use the blocks we just spent 8 weeks making. There were also another two layouts posted and I chose one of them. 


And I have come up with this. 
And this for the back. 
I quilted 1/4" either side of the block seam lines and chevrons in the border setting triangles (the corner of which were not cut large enough according to the directions).
I've learnt a lot from the experience. I made my first flying geese units in this quilt. It is my first sampler quilt. If I haven't seen a finished sample of a QA quilt don't start it until I have. Be wary about quilts that require so much fabric to be bought. 


And while there are a number of frustrations I am pleased to have finished the quilt and satisfied at how it has turned out. 

Monday, July 4, 2011

...the pirate quilt

I finished this last weekend...finally. 


I say finally because this was cut out about the time I made my first two deliberate quilts almost two years ago. An earlier version of this quilt was the first I cut out and the first top I finished but the second quilt I finished. 
The fabric is a collection from Spotlight, the find that was featured in the catalogue and had a pattern sheet that went with it. The solids are all the Homespun range. It really is just a twin size square within square design. 
I made the original as a practice quilt before I started a baby quilt to give to a friend for her unborn child. The second, this one was made with the scraps (plus a few centimetres extra of one or two of the fabrics). That is right I had almost enough scraps to make another quilt. 
I machine quilted Mark II .25" each side of the seam lines of the larger block and the Xs in the smaller squares and rectangles. The original was quilted in much the same way, but by hand. 
The backing is one of the wide backings in a mottled grey, also from Spotlight. 


Now I just have to work out what to do with it. We don't need two the same in this house and I don't know any pirate mad little boys at the moment. Ideas?

Sunday, July 3, 2011

...not for the squemish like my brother

You would have thought I learnt my lesson last time. 


Apparently not. 


It is a little embarrassing when you go to the doctor surgery and it is the same doctor putting you back together..and he remembers.


Four stitches later, anyone know how to get blood out of a cutting mat?


Note to self: Position dressing in sewing room for bleeding compression...and hope you never need it. 

... the lined hexagon pouch tutorial.

So way back when I made a pouch for the {Pretty Little}Pouch Swap over on Flickr. I knew almost right away what I wanted to make for my partner... but working out how to put that plan into action took a little bit of planning and trial and error.

But I worked it out in the end a recreated if for my partner for a little extra in the Goodie Bag Swap. And I took some step by step pictures the second time around so I thought I'd share a tutorial.  

Materials
1 zipper (about an inch shorter than the area of the hexie it will fit in)
Lining fabric
Outer fabric
The size of these last two is going to be dependant on how large you want your pouch to be.
Hexagon template .5" larger than your desired finised pouch size

Step 1. Determine your size and cut your template shapes.
You are going to need to figure out how large you want your pouch to be.When doing this remember that because of the irregular shape your internal area might be a fair bit bigger than that zipper opening. I usually cut my hexie shape about 8" that then finishes at a pouch about 7.5" at the widest point.
Cut your template from template plastic or take your commercial one out of the box.

Step 2: Cut your fabric
From your outer and lining cut one hexagon shape
From your outer and lining fabric cut two rectangles the height of your hexie template + one inch and the width of your template divided by two plus 2"
Two tabs the width of the zipper tape and about 3" long in both the lining and outer fabric. 


Step 3: Bind the ends of your zipper.
To prep the zip and make the following two steps a little easier I like to baste the open ends of the zipper tape together. I find this exceptionally helpful at the 'opening' end.
To do this place you zipper under the presser foot and zig-zag with a reasonable wide stitch forwards and backwards a few times. Repeat at the other end. I find pinning hinders rather than helps this process as it can misalign the zipper teeth. 
Place the zipper binding tabs right side together with the zipper in the middle. Stitch across the narrow end slowly, sewing over the zip. 
Repeat at the other end. 
Topstitch. 


Step 4: Insert your zipper into the back
Take the zipper and place it right side up on the right side of one of the lining fabric retangles, matching centres, then layer the outer fabric right side down on the front of the zipper. Raw edges should be aligned with the edge of the zipper tape. 
Using a zipper foot sew through all layers close to the zipper teeth. 
Topstitch through all layers each side of the zip. 
Flip the two fabric square over to expose the other side of the zipper and repeat the first two steps.
You now have a panel with a zipper inserted to cut out a hexie shape for the back of the pouch. 


Step 5: Cut out the pouch back
Lay the panel you created in the last step on your cutting surface with the zip closed and the zipper pull facing up. 
Lay your hexie template on the top, positioning the zipper where you would like it in the finished pouch. Mine is about a third of the way down. 
Draw around the template, you will need to do one side and then the other to make it as accurate as possible as the template will not lie flat because of the zipper pull. 
Cut out on your drawn line, through both the outer and lining fabric. 
You will end up with a hexie shape with a zipper inserted the same size and shape as the single outer and lining fabrics. 


Step 6: Sew the pouch together
Make sure your zipper is open. 
Layer your three pieces (outer, back panel and lining) in the following order - Outer panel, back panel with outer fabric down, lining fabric, right side down. 
Mark a spot about .5" in from both corner on one of the bottom sides. 


Sew through all layers around the edge, starting at one dot and finished at the other, locking stitches at the beginning and the end. Go slowly over the area with the zippers to make sure your needle doesn't catch and break. 
Fold the two open lining sections back and sew the last part of the outer section closed with the .25" seam.


Trim corner bulk. 


Step 6: Finishing off
Turn the pouch right side out through the zipper opening and the hole in the lining. It will be a tight squeeze so go carefully to make sure you don't damage any of your seams. 
Take something with a dull point (letter openers or knitting needs are good) and poke the point out. 
Hand sew the lining in the opening closed. 


Congratulations, you're done!