Showing posts with label Quilting. Show all posts

Wednesday, October 29, 2014

...Scrappy Stars - a finished quilt


A very long time ago Rachel hosted a beginning of the year quilt along focusing on quilt made from scraps. 

I started, and finished this quilt top.
Not long after I basted and started hand quilting.

Then for some reason it sat, for ages.

Late last year I finally finished it off! It gone straight into couch rotation.

Now, finally, with the prompt of a Scraptastic link up I've blogged it. 

I find it best not to rush things. 

Wednesday, February 20, 2013

...a quilt for K

It is a strange thing. Over the Christmas/New Year 2011/12 break we had in Perth I blogged a lot. The most recent break - hardly at all. 

Which means that although I took (sometimes pretty ordinary pictures) of all of the gifts that I made they have't made it here. In the last few days I have been cleaning out my camera and temporary image folders and come across them again so I think there may be a few catch-up posts!

I have a group of friends that have been friends since high school. Since then we have remained friends through extended international trips, interstate moves, weddings, children - pretty much the events of life that can lead a friendship from teen years to fizzle. Because we are all origionally from pretty much the same place we all tend to end up back in Perth at the same time for big events, like Christmas with some additions since high-school of partners and children. 

In the last few years we have implemented a 'not-so-secret-Santa' gift swap over lunch in the week between Christmas and New Year. This year K was to be my gift recipient. She had mentioned earlier in the year that she might like a quilt for Christmas and I have a sneaking suspicion the Santa drawing was not so random this year. 

The inspiration for this quilt came from a shopping center floor - I was sitting having something to eat in IKEA and looking down at the floor below and snapped this image. 

After a couple of different design options were tossed about in my mind (all squares on point or 9 rectangle blocks?) I made a decision and went about choosing fabrics that were true-ish to the image and would match K's couch. 
Once the top was complete I quilted the 'tiles' into the background with cross hatch squares and hand quilted inside each of the 'pattern tiles' in perle thread.


Because it was a gift I thought is also needed a gift bag. This is from Melody Miller's Ruby Star Wrapping - with a few variations.
Because I used batting scraps rather than the fusible fleece in the pattern I quilted the outer and batting layers. On the top I used the spots as star centres and quilted the petals in.
On the base and the bottom of the sides I quilted squares around each of the circles.
Pressed into service immediately! Later discovered to be 'fully machine washable' and with proper pre-wash prep strawberry doesn't stain!
SMS Rec'd: Quilt down, Quilt down!


Friday, February 1, 2013

...same, but different


Towards the end of last year I found out that some friends were expecting a baby and naturally my thoughts turned to quilt. The baby was still very new and so the thoughts were put aside while I started to plan Christmas gifts. A few days later a got a call from a mutual friend hoping to commission a quilt for the same child and we hatched a plan for a joint gift. Then I got another call a little later…could the order be upped to two quilts? It seems there was not one baby, but two.


When we got to the planning stages of the quilt we went through various options - same quilt, same colours/fabrics; different quilt, same colours/fabrics; Same quilt, different fabrics colours. There were positives and drawbacks to them all - the babies will share a bedroom so they had to look OK together, we wanted them different enough to be easily identified different and I, at least, didn't want one to be 'better' than the other - they needed to be equal, but unique as the babies will be.


In the end we decided to use the same prints with variation, different by complementary background colours and the same blocks but in different sizes while making the same size finished quilt. I used a variation of block 1932 on page 244-245 of the Encyclopedia of Pieced Quilt Patterns.


I sent a whole bunch of images to be co-gifter (did I mention that this was a cross border exercise) and then we skyped the fabric purchase (did you know it is easier to turn your webcam to the screen and show and image of a fabric rather than sending a link? I do, now). 


And then I waited for the fabric packages to arrive. One did and then I waited, and waited and waited for the second. It was caught up in the Christmas mail and as each day went by I saw my chance at taking one to Perth for the Christmas break to be hand quilted slipping out of my grasp. In the end I sewed the tops up after I had got home and based and had and machine quilted them in the week before the shower. I machine sewed the binding on both of them on the morning I caught the flight for a weekend away - that included the shower.


The hand sewing of the binding of one was finished, in the recipients house, on her couch with the quilt hidden under another blanket while I was chatting with her and another friend. The second was done on the morning of the shower.

  
In the end I did end up with a favourite, but so did the co-gifter and they were different quilts so I think I met my brief. Especially as mum and dad to be seem to like them both!

Monday, September 10, 2012

...Tulip Cross Quilt

I saw a picture of a quilt on this post over a year ago and haven't been able to get it out of my mind, it is the one down the bottom of the post. I did consider buying it for a time but I really wanted to make it for myself.

So I searched online and in my two blocks books, Encyclopaedia of Pieced Quilt Patterns and 5500 Quilt Block Designs. No luck.


After a few comment exchanges I got a better idea of how it was constructed. I spent another few night staring at the little picture and trying to work out where the seams were in the original and what formed the blocks.


In the end I got some graph paper, a pencil, a ruler and a compass and drew it out as a finished block. I was pretty happy with the first version and only made a few changes in scale. I cut out the drawn block, traced it onto template plastic and added seam allowance until I had a template set for the block.


And then I got sewing. It isn't an impossible block, but it does require some technical skill - a 'Y' seam and a curved seam.
I ended up deciding to make this quilt for the Quilter's Guild of New South Wales Under 35's Quilt Competition. This year the theme is "How Does Your Garden Grow?"


Complete with tulips, thanks.


Because to the size restrictions in the competition I stopped at 16 blocks - finishing at 95cm (or just over a yard) square but I would love to make a 6x6 layout version as a centre medallion. I think this would show off the crosses better and make the name make a little more sense.  


I posted it off today and will not see it again until sometime in December.

If you happen to be interested in seeing the show (and maybe sending me a picture of my little quilt hanging in the show) all the entries will be on display in the Newington College Gallery, Stanmore Road, Stanmore, Sydney from the 21-23 September from 10am - 4pm daily.

Friday, August 31, 2012

...on a whim

A couple of weekends ago, on a whim, I bought a 90 degree triangle ruler at Spotlight with a 25% off voucher.

When I got home, on a whim, I got home and used it to cut up a 1/2 yard bundle of spring theme prints I bought ages ago from Sew Fresh Fabrics when I got free shipping.  Cutting them into strips and then cross-cutting with the new ruler.


On a whim, by sewing the triangles into pairs, the squares and trimming to 12.5" I made this quilt top. 


It isn't huge - the blocks are 12" finished - which if my maths is having a good day means that this is 49 x 61" in the current state.


I'll need to wait for another whim to help with finding a backing, basting, quilting and binding but even without all that yet this was a pretty satisfying evening of sewing. 

Monday, July 9, 2012

...making links

When I posted about my vision for the May do. Good Stitches quilt by the cherish circle I was thinking the block would be a good scrap buster for the bees in the circle, would make a decent sized quilt and the blocks would look like little chain links, hence the name. 

When I went to think of a title for this post I also though - hey, it links us all as well. I'm not too quick with things like that sometimes. 

The top came together really quickly thanks to the 12 oversized blocks it is made up of and basting was completed over the weekend when I scrounged enough basting pins from the already quilted sections of the other 4 I am currently quilting (3 hand, 1 machine - yes I know, I'm crazy). 

I've been working on practising my free motion quilting for a little while now, mostly on smaller pieces and I felt ready to tackle a larger project. In the centre of the links I FMQed some lines, Amanda Jean style, and then in the larger white squares went back and made some spirals to soften some of the lines. I'm pretty darn pleased for a beginning effort. I'd like the spirals to be a little more round and a little less egg shaped but I can't draw that well with paper and pencil so I don't think I can expect miracles with thread and fabric. 

I used a Gutterman Sulky 30wt in white cotton and I found it really good to use with only a few breakages (which I really think was down to my technique and not the machine). 

It's bound in a white solid from my stash which I think frames it nicely and blends well with the Little Things fabric used on the back. 
It measures about 59"x 78" so it is a good size and it will be off to Needy Stitches later in the week when I head down that way for work. 

Wednesday, May 9, 2012

...quilting, quilting, quilting

It has come to that time of the year when getting pictures is difficult, it is dark when I leave for work in the morning and get home at night... and the weekends are often gloomy and rainy.

The upside? It is wonderful to sit on the couch in the evening under the quilt and wield the needle threaded with the perle cotton. 

I'm having a great time enjoying the the little frames fairytale friends. 

Saturday, May 5, 2012

...N's quilt - Cog and Wheel

I took the fabric and the recently cut templates for this quilt to the first Sit and Sew Day for the Melbourne Modern Quilt Guild I went to last year, in April.

A year later I have finally finished it! After I was inspired by this stack of fabric sitting on the table near this pattern and coming to the impossible to forget conclusion that this fabric and this pattern were a match too good to pass up I worked on the top almost exclusively at the sit and sew days over the next few months. I finished the top in about September but was stalled there for a little while as I tried to find the right green solid for the back. My Kona Color card said Bayou was what I needed but it was a discontinued colour by the time I started my search and I couldn't find enough.

In the end I have gone with a different shade altogether - Green Tea from the Spotlight Prima Homespun range - but N seems to like it. There are a couple of extra scraps from the front fabric in there too to bring it all up to size.

I chose to quilt it as described in the pattern - this was not my original plan but I think if a quilt designer goes to the trouble of suggesting a design there must be good reason for it. I know when I plan a quilt I almost always consider the quilting design at the same time as I plan the patchwork and fabric choices.

The one change I did make was to follow the marked line with my walking foot rather than hand quilt the design. Despite the need for some fairly heavy duty pushing and pulling through the rather small throat of my machine, and the related puckers on the front, I think this was the right choice for me.

I like to quilt my own quilts (like in the planning I think all the stages of making a quilt are equally important and I'd feel a little like I cheated if I got someone else to quilt my top for me - but I know and respect that is not the same for everyone) but sometimes my lack of machine space is a little annoying, especially as I usually choose to make twin or queen sized quilts. However, unless the machine fairy decides to come along, these are the parameters that I need to work within.

Tuesday, May 1, 2012

...a winter of hand quilting

Very early this year I posted about my desire to finish the quilts I had at the stage that were waiting for quilting. I left the tops to be hand quilted off the list, however, as the Australian  summer is not conducive to hand quilting the list of them is here now (and expanded with early year top finishes) to give me a Winter of Hand Quilting.

1. Bee A Little Bit Japanese Fairy Tale Quilt

2. Bee Seam Piecing Down Under Circle Quilt
I'm sneaking this one in here a bit as it will have both hand and machine quilting. I will be machine quilting 1/4" inside all the sashing strips and with an X through all the border squares. The hand quilting will add a little to each of the blocks and secure the three layers inside the block dimensions. 

3. The hand pieced Star Quilt

4. Flurry Baubles Christmas Quilt
Course I need to finish the top first!

Monday, March 19, 2012

...a finished top - entierly by hand!

I almost can't believe that I had the patience and persistance to finish this quilt top - and that I still am enjoying it so much that I am already planning the quilting to be done soon - and by hand as well.

There are 32 'star' units in the quilt as well as 6 half 'stars' at the edges, 62 hexagons, 16 half hexagons and 10 half diamonds to form the edges. Each one was basted by hand and hand sewn into the top and then all 304 paper shapes removed. Well almost all, I have left the edge ones in for now and remove them at basting time.

All that adds up to 1592.5" of whip stitched seam. I was glad of a thimble.


The top measures 45" x 56" so it it pretty firmly a baby-lap sized quilt - and leaves me with nothing but admiration for people that can made a full sized quilt in this way - and using much smaller shapes!

I've started on the backing - ready for basting soon. There are 'spare' hexies (basted when I was going to make a multicoloured bacground) joined and then hand appliqued to the backing to hide the seam joining the two backing pieces together. There is a random spare star to be appliqued on the back as well - but I need to wait for after basting for placement. Confused - I'll explain in pictures later!


The next job will be to prepare the batting - as this quilt is part of the Scrap Attack Quilt Along I thought I would continue with the scrap theme. I have an (overflowing) box of reasonably decent sized batting scraps and will piece two of these together to get the batting for this quilt!

Monday, March 12, 2012

...finally finished... something

This is not my longest standing work in project - I haven't even really been working on it officially of much more than a week but I have been planning it for almost exactly a year. And it feels like absolutely ages since I have actually finished anything so this is incredibly satisfying.
That isn't even all of them!
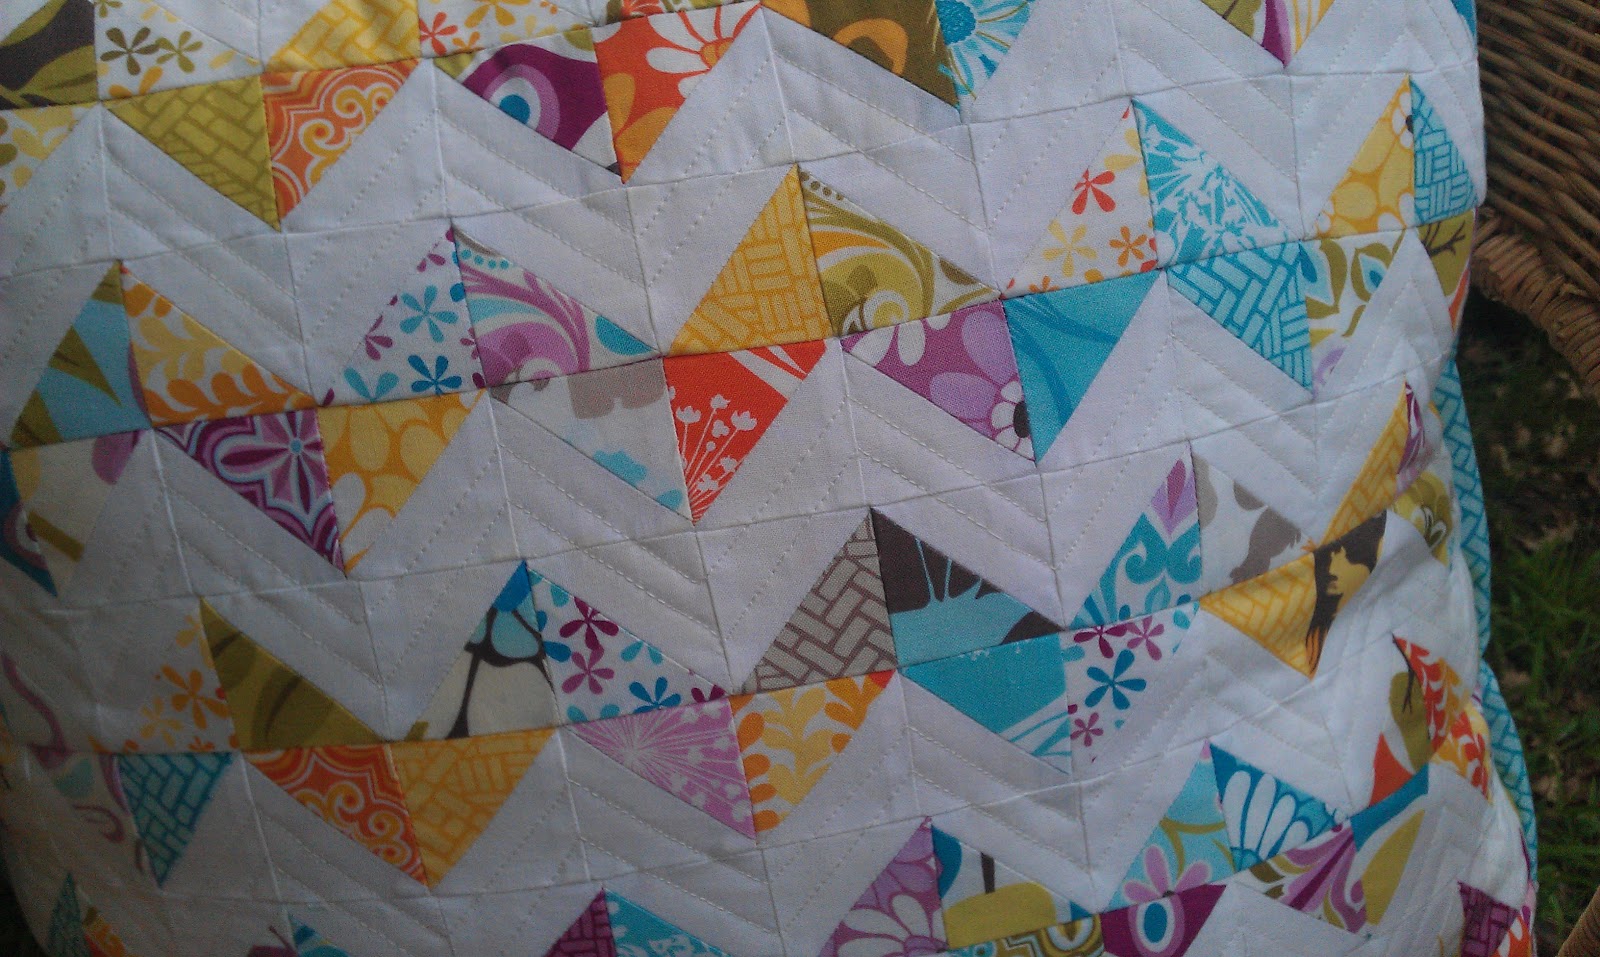
This cushion cover is made from 14x14 1.5" finished half square triangles that were the trimmings from the star corners that I had made saved from when I made this quilt over the same long weekend last year. That is 196 HST units and 392 tiny squares of fabric. Why did I think that this would be a quick project when that is more seams than some bed sized quilts have?!?


I trimmed them all to 2" - which in most cases was very little fabric indeed but I ended with with quite a pile of sneeze inducing scraps!


I quilted some zig zags into the white areas - the cushion front is simply the panel on a batting scrap - there is no backing.


I made the cushion back using about 1/2 yard of the central park trees I had and  used this tutorial for a concealed zip back - a slight error means the zipper flap faces the right way or the trees do. I chose the trees.


I love the look of cushions with a piped edge but don't think I do it well enough so this time I tried binding the pillow as I would a quilt and I quite like how it has turned out - with the frame. I might be a convert to this method.


The binding is the leftover quilt binding, the backing some fabric bought for the quilt and never used and the story of the blocks is already told! So in the end I have a 21" square cushion completely from scraps!