Showing posts with label sewing. Show all posts

Saturday, November 24, 2012

...Crafty Tote

When Nicole announce the Bag Project of the Month, and specifically her project, I loved it. And waited quite impatiently for the June issue (Volume 13.6) to be published so I could make it. Then I waited pretty impatiently again for the Mama Said Sew fabric to arrive in stores because by that time I knew I wanted to use it for the lining.


Finally, a couple of weekends ago I got around to making it. I use some fabric from a Melbourne screen printing company, Yardage Design, in a sale earlier. This fabric was labelled as an imperfect second but it looks pretty great to me!

For the feature panels on the top I used some basecloth I bought from the same supplier and screen printed some panels of my own with some word art. I used Wordle to create the art and then played around with the size on screen and paper to make them fit roughly inside the pattern piece.


A change from the published pattern - I used two different fabrics for the lining. the red script from Mama Said Sew and the black Newsprint from the same collection by Sweetwater. 


As I have come to expect from Nicole's patterns the instructions included a lot of pictures and information on  techniques to assist in construction and I am sure that is no small part of the quality I was able to achieve with the finished product.


I did find some parts of the pattern difficult to follow and there appeared be a number of errors in the cutting directions and the construction (based on the pictures). For example, extra interfacing needed to be cut for several of the pieces. I am assuming Nicole has noted these as well as she had re-released the pattern under her own brand.


I also made a couple of changes, I dramatically shortened the handle and would shorten it more if I made it again. And the extra fabrics for the pockets. I think they make them easier to see. I used rectangular links for the handle instead of the round ones and use them again but alter the handle size next time to fit it more snugly.

I'm really really happy with it. It fits a huge amount of stuff in it while still having them easy to find. I learned a few new tricks and the virtues of stiffer interfacing. And if you make I can't recommend a walking foot highly enough!

Edited to add: These are the changes I made due to pattern omissions or confusions. 
It isn't to say that the pattern won't work without these changes, careful reading and some prior knowledge should serve you well but knowing what to watch out for can be helpful. The fabric/interfacing/fusible batting requirements as listed in the magazine will be enough for the additional pieces. 

I've emailed Nikki to let her know what I noted and confirm the changes I made were what was intended - I'll update these again based on her responses if needs be. 

1. This one was included on the Homespun website - a template had an incorrect label (there were two Lid Side Panels and one should have read Lid Center Panel) but was the correct size and shape. I actually didn't find this errata until later and it is pretty obvious to pick.
2. You will need 2 x lid and base wall interfacing (the directions only ask you to cut 1)
3. You will need to cut lid and base wall batting (As shown fused in the Step 39 picture on page 48)
4. I also cut a piece of batting for the back-wall hinge (it doesn't ask you to cut any)
5. I also cut an additional batting in the base/lid shape so there was batting in the lid and base.
6. While not technically and error I had huge trouble finding the dimensions of the wall pocket, lid & base wall and the back wall hinge (there are no pattern pieces for these, just dimensions given as they are rectangular). You can find them in Step 15 on page 46.

And my tip - use a walking foot for all steps of the construction!

Monday, March 12, 2012

...finally finished... something

This is not my longest standing work in project - I haven't even really been working on it officially of much more than a week but I have been planning it for almost exactly a year. And it feels like absolutely ages since I have actually finished anything so this is incredibly satisfying.
That isn't even all of them!
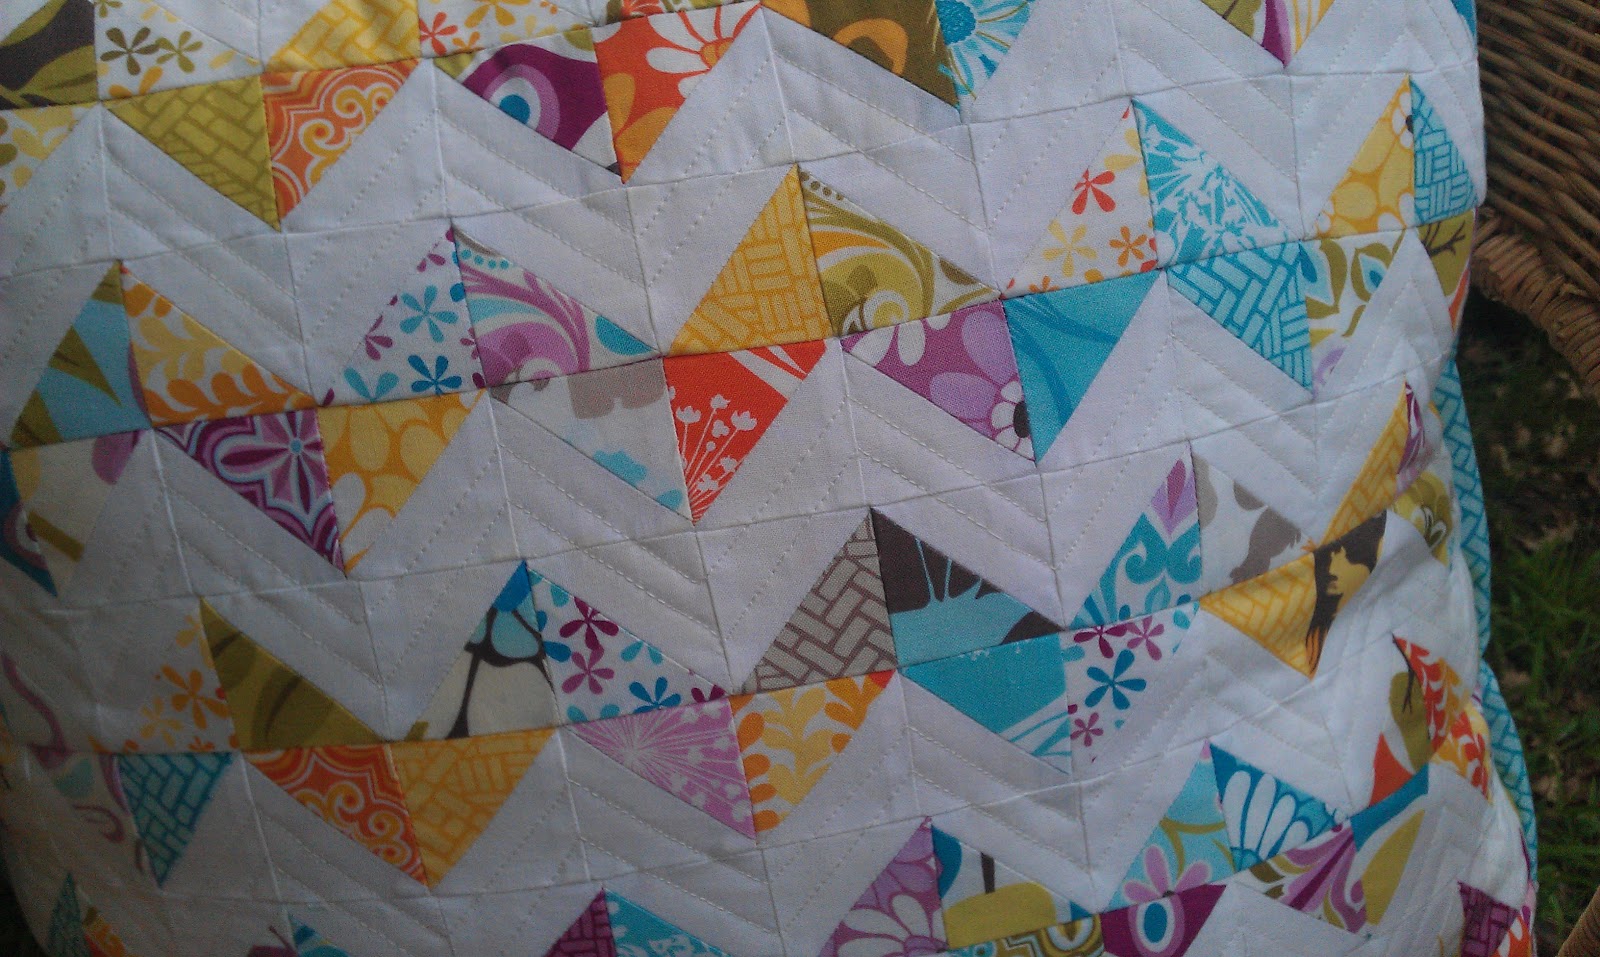
This cushion cover is made from 14x14 1.5" finished half square triangles that were the trimmings from the star corners that I had made saved from when I made this quilt over the same long weekend last year. That is 196 HST units and 392 tiny squares of fabric. Why did I think that this would be a quick project when that is more seams than some bed sized quilts have?!?


I trimmed them all to 2" - which in most cases was very little fabric indeed but I ended with with quite a pile of sneeze inducing scraps!


I quilted some zig zags into the white areas - the cushion front is simply the panel on a batting scrap - there is no backing.


I made the cushion back using about 1/2 yard of the central park trees I had and  used this tutorial for a concealed zip back - a slight error means the zipper flap faces the right way or the trees do. I chose the trees.


I love the look of cushions with a piped edge but don't think I do it well enough so this time I tried binding the pillow as I would a quilt and I quite like how it has turned out - with the frame. I might be a convert to this method.


The binding is the leftover quilt binding, the backing some fabric bought for the quilt and never used and the story of the blocks is already told! So in the end I have a 21" square cushion completely from scraps!

Monday, July 4, 2011

...the pirate quilt

I finished this last weekend...finally. 


I say finally because this was cut out about the time I made my first two deliberate quilts almost two years ago. An earlier version of this quilt was the first I cut out and the first top I finished but the second quilt I finished. 
The fabric is a collection from Spotlight, the find that was featured in the catalogue and had a pattern sheet that went with it. The solids are all the Homespun range. It really is just a twin size square within square design. 
I made the original as a practice quilt before I started a baby quilt to give to a friend for her unborn child. The second, this one was made with the scraps (plus a few centimetres extra of one or two of the fabrics). That is right I had almost enough scraps to make another quilt. 
I machine quilted Mark II .25" each side of the seam lines of the larger block and the Xs in the smaller squares and rectangles. The original was quilted in much the same way, but by hand. 
The backing is one of the wide backings in a mottled grey, also from Spotlight. 


Now I just have to work out what to do with it. We don't need two the same in this house and I don't know any pirate mad little boys at the moment. Ideas?

Sunday, April 3, 2011

A curvy weekend

Progress on the Double Wedding ring this weekend. The top is almost done and I have some (needing to be kep secrect at this stage) plans for the backing that I hope to execute this week as soon as a finish the last column.


Fingers crossed it will be ready to deliver in a week and a half!

Saturday, April 2, 2011

A blocky weekend!

A bee block weekend was had by me last weekend


The end of the month was fast approaching and I had some bee blocks to make before they were late!


First up were two sets of blocks for Bee Seam Piecing Downunder with the February blocks for Erin being delayed after it took a whole month for an envelope to arrive in the mail from Adelaide. Continuing frustration from Australia Post is becoming the norm for me lately!


Erin had previously asked us for our favourite colour and sent us some fabric in that colour as well as other fabric and set us a free choice block. With the flying geese kick I had been on recently this was the first block I made.
Originally it was to be three rows of flying geese until I (thankfully checked) the instructions and noted Erin had asked for 10.5” blocks.
More triangles for block two seemed fitting and a pinwheel emerged from the machine.


Next up was two of these blocks for Nicole in the same bee but for March. Based on this quilt by Red Pepper Quilts that was apparently originally based on another seen on flickr she asked us to create these, full of squares and half square triangles. Unfortunately we were all a little short of the yellow as the bolt appears to have been narrower but this and the almost finished second was sent on the way.
This will be a wonderful quilt but with so many small pieces in each block is it one that is helpful to have some assistance in piecing!

Also on the list was the this scrappy stashbuster block for Crystal in Bee (a little bit) Japanese.
Thankfully she had precut all the tiny little squares for us and these came together surprisingly quickly.
A lovely detail that she requested was that we sub in two squares of our own and then raw edge applique another scrap of this same fabric to a label/siggy block to help her identify and remember everyone's contribution in the final quilt.
She also asked for our favourite quote to be included on the label - I went with the one I consider most fun.

The final bee blocks for the weekend were two for the Faith circle do. Good Stitches {a Charity Bee}. Kathy Dougherty of Material Obsession fame (both the store and the books) had given permission for us to use the stashbuster quilt pattern so long as it was not published publicly.
As this quilt will be going to a little baby girl I included some fun prints and a little pink.
I really love this quilt (it is on the long, long list for things I might get to one day) and was pleased to be able to have a small hand in one in the meantime.

To round out the weekend I finished the final two blocks I still had to go for the Quilt Bloggers Blockapalooza

and fixed an earlier one when I found some more orange stripe.

Sewing the top together is the next step!

This weekend it is all about the double wedding ring quilt top (and back hopefully!)

Thursday, March 31, 2011

Sometimes all it takes in an hour....

I really enjoyed making Claire's quilt for her and I have mentioned many times on my blog and earlier on my facebook page that I enjoy crafting for others and I find completing charity projects or collaborative quilts to be enjoyable and personally satisfying way of doing this.

But as you can see on the RHS of the blog I have a VERY long list of things that I have started, have planned or would like to try and there are only so many hours in the day and big projects can get left unfinished.

But sometimes all it takes is an hour (or just over if you keep ducking into the other room at the end to watch the beginning of City Homicide) and a little bit of mess.
These first two blocks were made for Abi from the Bee Seam Piecing Downunder. She very sweetly asked the other members of the bee and I a few weeks ago if we would be willing to make some quilt as you go blocks based on sewtakeahike's tutorial.

She will be adding these to those she receives from another bee she is involved with after forgoing her month and asking for these blocks in return. Of course they went right on the list.

This block is to be included in a playmat quilt for another member of this bee, Kelly, and her yet to be born second child.
Nicole had the wonderful idea and suggested stars of various styles from this tutorial from Silly BooDilly based on a concept by Gwen Maston from Liberated Quiltmaking - the first one.

Tuesday, March 29, 2011

Claire's Quilt - A quilt by do. Good Stitches {a Charity Bee}

Claire’s quilt is on her way to her now.

This quilt was made with blocks contributed by the members of the do. Good stitches {a Charity Bee} on flickr in a break from regular programming. Generally the quilts are designed and blocks joined to tops and quilted and bound by the ‘quilter’ members all of whom are based in the US but I asked and the group agreed to make an exception to normal progress in the face of the natural disaster playing out in Queensland at the time.


Sadly these disasters have become all too common in more recent times.


Inspired by this quilt I asked for Disappearing 9 patch blocks with a white centre in varying sizes, with the tutorial posted here. These were sashed with more white and squared to 19.5” and then sewed together in a 3x5 grid. This has yielded an almost 60” x 90” quilt that is the perfect size of an Australian King Single sized bed (or large couch quilt if that is more Claire’s style).
It is backed in a wide cotton fabric from IKEA and bound with Kona Coal (this gives a nice contrast frame to the front and blends well with the backing.
I have quilted it in a unmarked grid style with each stitching row being about 6” apart (and much straighter than I thought it would be when I started)
It is labelled and dated on the back – label created in Kona Snow with fabric stamping ink and has survived one wash so far.
I am so pleased to have this quilt on the way to a young person that deserves more than most a nice surprise and a metaphoric pat on the back. Since this quilt has been started Claire’s family has had to move house and pressures that predate the flood continue. I hope the arrival of an unexpected parcel cheers her and that she likes the colours and design of the quilt.
I would also like to publicly thank Julie at this point as well. Julie, herself a resident of a flood affected area, wrote an email to Toni from Make it Perfect that inspired the Flood Relief Auctions. When I went looking for a recipient for the quilt Julie, living in the area, was able to find such a person for me. She has also very generously made two extra quilts, one for each of Claire’s younger brothers that will be delivered later this week as well.


So thank you to all the members of the do. Good Stitches {a Charity Bee} and Julie and best wishes to Claire and her family.

Sunday, March 20, 2011

A weekend of almost dones....

I've been really busy this weekend and have made a lot of progress with nothing finished to show.

So a series of progress shots

Claire's quilt - do Good Stitches {a Charity Bee}

This one was basted with a Ikea fabric backing, quilted in a grid pattern with horizontal and vertical lines approximately six inches apart.
The binding (Kona Coal) has been machine sewn to the front, just waiting on the back to be hand stitched.

Doll Quilt
I finally finished the hand quilting 
and this this was bound using a voile - Pastry Stripes in blue.
A label has been made using printable fabric and just waiting to be stitched on.

Charming Stars in the Park quilt
This was basted and then machine quilted 1/4 inch inside each of the sashing lines and borders.
I have started hand quilting inside each of the stars in a variegated blue perle no 8 cotton.